Help Write Tiny Homes into the IRC (International Residential Codes) by following this link and signing the petition. Every time we raise our voice, it makes it harder for Government to ignore us.

Help Write Tiny Homes into the IRC (International Residential Codes) by following this link and signing the petition. Every time we raise our voice, it makes it harder for Government to ignore us.

I wasn’t planning on using the entertainment center. I’d forgotten it existed. I’m not sure it is an entertainment center, as it also has a matching, rather large chest of drawers that goes with it, so it’s got to be for a bedroom. Anyway, I’d planned on building nearly everything inside, and have lots of spare wood and plywood to do so, but honestly, I don’t think my building skills are up to it. Sure, the build itself is solid. I’ve been told many times that I over-engineer things. But my detail work can be…sketchy? Hehe, yeah, sketchy. I believe with practice and some hands-on tutorials from a more experienced builder, I’d be able to put together creditable cabinets and whatnot, but not now. I priced out cabinets and they are rather expensive, and heavy, and the sizes are mostly not right for the space. So, what to do?
Look around here is what to do. I thought about scavenging bits and pieces from this house, but I didn’t want to damage it. Plus there’s still that whole having to “build stuff” thing. As I wandered from room to room, assessing what was available, I stumbled upon this oak wood set. Ah-ha! As it is modular, it seemed a perfect solution. Without further hesitation, I started grabbing parts.
The only thing that took a lot of time was figuring out the placement of the upright attachment boards. They had to be placed just right to set the hooks on the back of the shelves and cabinets properly, as well as being as close to the studs as possible for strength. My spacial skills are apparently not too bad, as no mistakes were made. So attach those boards securely to the walls, hook in the various bits, and done. Well, except that after an experimental drive, several of the shelves fell down! So, back to the hardware store for metal brackets to permanently attach everything. Cheap and effective.

Modular oak shelving pieces. See those metal rods sticking out from various bits? They stick into each other and the uprights.
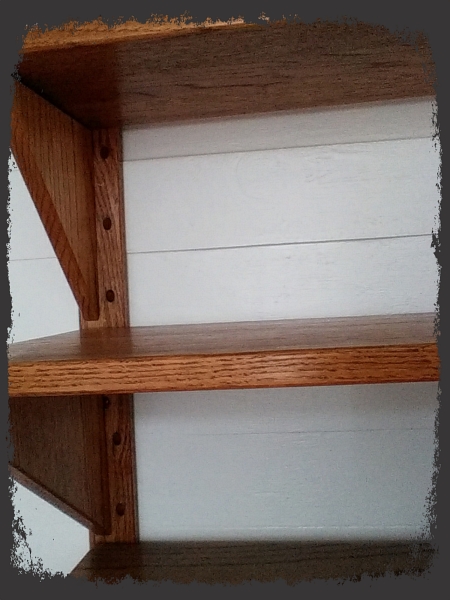
Shelving, cabinets and desk all hook onto uprights before I added the little metal brackets.

I have a desk under the window! 🙂 The toilet will go between the desk and the kitchen cabinet. The cabinet in this picture is pulled out and there’s actually quite a bit more room than shows.

Re-purposed solid (even the back is wood!) EXPENSIVEquarter-sawn oak entertainment set from my aunt and uncle. Heavy, yes, but solid and, FREE.
As for the two matching white cabinets I really like and wanted to use, they turned out to be way too heavy to hang. Sadly, I won’t be using the longer one at all (which was going to hold most of my kitchenware), but the squarish one got some legs and a top, and is now firmly screwed to the walls. To build the top, I had to glue and clamp two pinewood panels together and then cut them down to get something large enough. The cabinet is now a good place for heavy cast iron and random largish stuff.

Painted legs to transform the hanging cabinet into a floor cabinet.

Strong wood braces made from random 1/2″ plywood pieces added to the bottom of the white cabinet, and a thing to screw the legs into.

Revamped upper cabinet. Painting the cabinet white, but I might try the tangerine color for fun. 🙂 The door is nearly ready to install, and it’s been painted a matching green. I think I’m going to paint the bit of pink on the side wall above the counter top white.
Taking the place of the longer cabinet is a bunch of roll-out closet baskets. Light, strong, semi-attractive… works for me!

Drawer racks installed. The baskets are in the house being filled and sorted.
The lower kitchen cabinet was the real bear. I couldn’t push it back against the wall, because of the front fuel line sticking out of the floor and wall. Solution? Either build a shelf behind it to cover the huge (8″) gap, or cut a hole in the back/bottom of the cabinet. No more building!!! 😦 So, my son came over and cut a hold for me, as cutting holes into furniture was something I couldn’t bring myself to do. My anxiety over it was ridiculously overwhelming. Even though I’d added strong supports to the underside of the cabinet after bringing it home, I had visions of the whole thing collapsing in on itself.
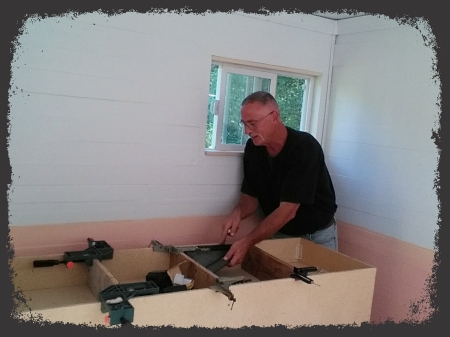
Meet Richard from one of the local big box stores where I bought the cabinet. He helped me clamp in the support pieces I added to the bottom of the cabinet. Nice guy, right?
Yeah, that didn’t happen, and now the cabinet is against the wall and out of the way. Thanks very much, dear boy!

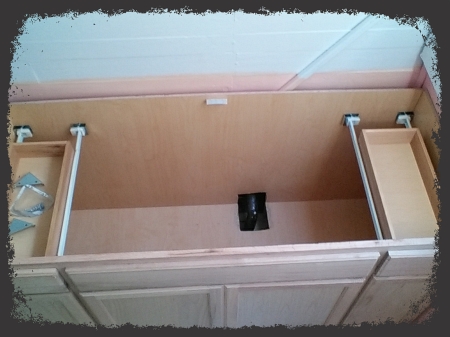
I can’t do anything about the metal bars, but was able to work around this fuel line.

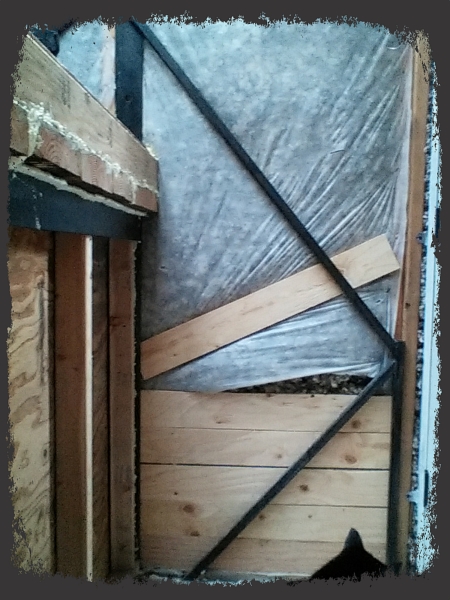
See how far the cabinet has to stick out? NOT GOOD. Oh, and in the background you can see the beginnings of insulating and covering the loft front area. OH! And you can see the linoleum all laid down and looking pretty on the loft floor.
Problem solved.
I did, however, cut the counter top to size, and cut out the sink hole, by myself. So easy! I still have the hand pump marine faucet to cut a hole for, but now I’m not worried about being capable of doing that. My new saw blade for finish work has really impressed me.

Look at that clean edge from my new finishing saw blade. So proud.
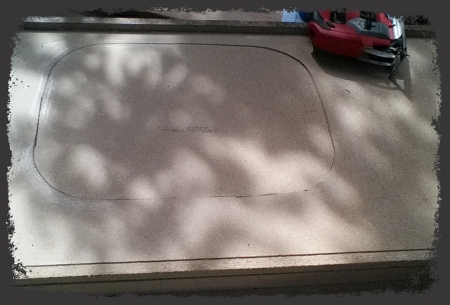
And now the hold for the sink….
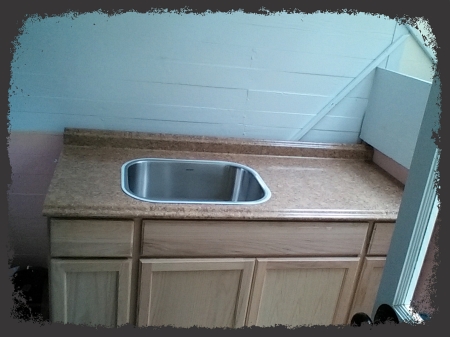
BOOM. It still sticks out an inch due to the metal bars, but I can live with that.
So that’s the cabinet roundup. I thought it might be interesting for people to get a sort of spacial sense of how I fit into this incredibly tight space. I’m 5’5″, and the ceiling is 7′ high.

I can easily reach and remove the top drawers to access the contents, but the ceiling doesn’t feel too low. Yep, that’s me in glasses!

And here I’m standing right by the bed loft area. The reflective ceiling really helps to add light. The camera I’ve been using is on my Kindle Fire, and has no flash. All the pictures pretty much reflect the actual light inside. You can also see the baskets I’ve found to store things on the shelves, and the cool closet curtains. I still need to find baskets to fit the upper shelves.

I didn’t realize it’s been so long since I last updated my progress. Once again, there’s a boat-load of pictures of stuff that’s been “finished”. It will take me a bit of time to gather together a semi-coherent description of everything, so please bear with me. 🙂
Um, I’ll put a couple up to show where things were at least recently, and then I have to go back to work.
Re-purposed quarter-sawn oak entertainment set from my aunt and uncle. Heavy, yes, but solid and FREE.

Very cheap and light oak-veneered kitchen cabinet. Super flimsy, so I hope it will hold up to the abuse….

Finished the curtains, and I love love love being able to use this fabric! Been holding on to it for years. :p The closet curtains are actually shower curtains that look like beech (birch?) trees.
Hope you all are enjoying the last bit of summer!

I like to paint. It’s easy and fun and colors, whee! Funnily enough, the walls mostly will be covered by closets and cabinets and stuff, but I like knowing there’s something pretty behind all that.
After trying the pink painted high up on the walls, with a pale yellow on the ceiling and upper walls, I discovered I vastly preferred the white over my head. Here’s the before:

OMG PINK
White reflects light better and looks clean and fresh. Luckily I still had the Zinsser Oil-based primer to cover the other colors. It took one coat, plus two coats of Glidden Extreme White Semi-Gloss Exterior Paint to cover everything perfectly. Yes, I used exterior paint inside. I also used it on the cedar trim on the exterior, after priming with the Zinnser (which is perfect for cedar), and had a ton left over. Since I’m not living in the space, and since the oil-based primer is also stinky, I figured, why not? There’s time for it to off-gas before I move in, and the color is just what I wanted. I can’t afford to waste paint, or really anything. This is one of the reasons why the structure is a little odd-ball. 🙂
After I tamed the yellow and pink, I started trying for the look I wanted ~ a blend of pink, yellow and tangerines. I have a favorite skirt that I love that is pink and orange, green and reddish, and I want to try those colors in the interior. I have a little pot of grass green for…somewhere. Here’s what I have now:

The colors!

A cool blend on the side walls

The wall under the loft. I like this area the best
I like it. Luckily, the area I like the best, the wall under the loft (behind the cab of the truck) will show the most. It’s pretty and not overwhelming. Other than some touch ups, and maybe adding a little red at some point, and of course the moldings, the walls are finished.
Oh yes, the leak. It’s not the roof, although yes, there was a small leak which is now gone due to the new roofing. It might have been present the whole time but hidden by the bigger roof leak. This new leak is actually through the door/skylight itself…it appears that the panes of glass and the wood joints have loosened with all the cutting and hoisting and general messing around (plus the door wasn’t built to be installed flat, of course). But I have a solution! Today I will go out and buy some more razor blades to clean the glass panes, sand off the extra silicone everywhere, and prime and paint the wood portions. Once it’s dry, I will screw on to the face of the door, this stuff:

Polycarbonate Sheet from Lexan
A glass shop right down the street can provide a thicker product than is available at the big box stores, and will cut it to size, and cost less than buying it and using an expensive saw blade (which I don’t have) to cut it. Plus, they will do it right, lol. Yes, I am farming out some of the work. And glad to do it. And yes, it’s another expense, but a necessary one. I’d always known I might have to go this route, so it’s not a surprise, and I’ve had time to figure out exactly what is needed.
I don’t know if I’ve already shown how the exterior looks now, all painted up and finished, so before I get to work on the skylight, here’s a few more pictures:


So you are all up-to-date. I’m off to buy those razor blades and a saw blade for finish work. Be well!

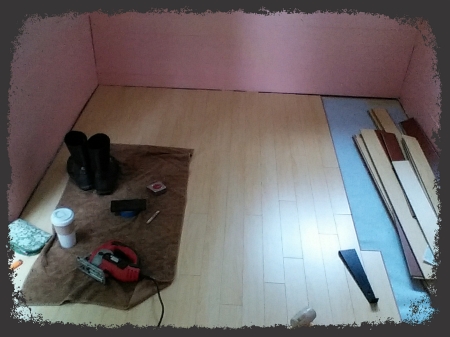
My medicine is kicking my butt today. I’m in the little house, trying to install laminate flooring ~ laying 4 boxes of the stuff out for easy access, reading the instructions (I’ve also watched many, many videos), and generally just trying to get this done… and then I get really dizzy and have to immediately lay down, right there, on the overcrowded floor. This happens over and over. It’s intermittently incapacitating. I mean, it’s not like I’m not used to my medicine causing me problems sometimes, but this is not a good time for that.
About two hours later, two rows are in. I fought hard for those two rows. It took me over an hour to get those two rows properly laid. I’m already taking a break, trying to wait out the side effects of the meds. and trying to give myself a pep talk. Then I start thinking about all the blogs from other Tiny Home builders. Why don’t I see in their blogs all of the trouble that seemingly small things give me? All I see are talks about the planning, maybe some shots of the work in progress , then some pictures of things completed, and nothing, nothing about any difficulties . Is it that they had none? Is it the fact that usually there were generally at least two people working on the project? Maybe they have some friends who know what the heck they’re doing? I don’t know. It’s discouraging.
Well, it’s a few hours later now, about 5 o’clock. I took a break shortly after struggling with the first three rows. I don’t know what happened during that break, but when I went back to the flooring, it clicked (pun intended). I was able to finally get as much done in five or 10 minutes as I did in the first hour . It went slick, it went smooth, it was easy.
I paid about $17.50 for each carton of the flooring and each carton covers about 20 ft.². The stuff isn’t made anymore as far as I can tell, but when I compare it to what is available now it ranks with the high-quality stuff in it’s thickness and layers and whatnot. I don’t know if I got a good deal, but I know I got good stuff. I bought it years ago along with a kit to install this type of flooring. That’s what made it possible for me to have it in my home ~ buying it from a ReStore when I could afford it and holding onto it, storing it, having it be in the way; but eventually being able to put it to use. So much of what I’d gotten was intended for the bigger Tiny House, and doesn’t work in this space. I’m glad I was able to use the flooring, at least.
I put in the loft flooring a couple days ago. For that space I used linoleum ~ the real stuff, made with natural ingredients like linseed oil, pine rosin, ground cork dust and wood flour. It’s thick and flexible and I like the way it looks. Aside from giving myself a couple deep cuts from the carpet knife I used, it went down pretty easily. There was a good amount of Reflectix left over from the roofing I did on the other house, and so I laid it down on the subfloor to help with air leaks and to add another layer of insulation. The wool layer up there is much thinner than in the main floor. Over that I put down some green stuff…I don’t have a clue what it’s for, but it’s soft and flexible, and seemed like a nice base to lay the linoleum on. If someone reading this recognizes what it is from the pictures, would you be so kind as to fill me in?
So, pictures. 🙂

Linoleum unrolled and resting upside down. Recommended it’s left like that for at least 24 hours to acclimate to the room.
It’s quite thick, but fairly easy to work with.

Reflectix laid down on the loft floor

Covering the Reflectix with the mystery green stuff

The mystery green material has a frog (?!) printed on it
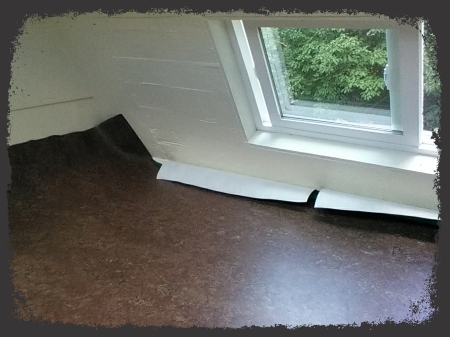
laying down the linoleum, preparing to trim it to size. I failed to take a picture of the finished floor :p

Somewhat uneven subfloor in the main room
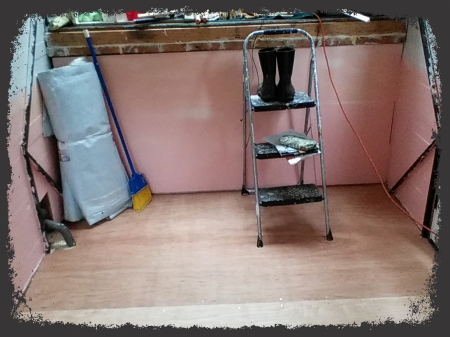
Underlayment glued and screwed down. Nice and level now!

Moisture barrier for under the laminate flooring. Got this huge amount for $5 from a ReStore

piecing the moisture barrier together with tape

First few rows are in
going down quickly now…
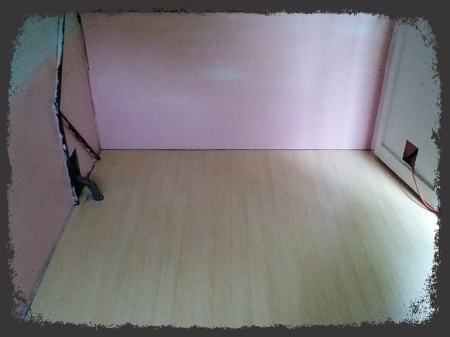
…and done

some things didn’t go so smoothly but will be held in place by the molding. It doesn’t overlap like it seems, it’s just sort of sticking up
So all in all it took one day to install the linoleum in the loft, and one day to install the laminate in the main room. Not too bad, really. 🙂 Certainly easier than other things have been!
Now I have to figure out what’s next. I’ll post once I’ve gotten that sorted out. Till then, enjoy your summer!

The rain won’t come to let me test to make sure no water’s coming in. Not that I see how it could, as the entire roof surface, including up the base of the skylight, is completely covered in rubber…. It took about a week to remove the old roof and finish applying the new one. This is another picture-heavy post to try and illustrate the steps I took. Here goes!
Day 1: Removed the metal roofing, with an assist from my ever-so-helpful neighbors. The caulking I’d used to try and waterproof it is so sticky, I couldn’t get the front piece out from under the drip edge to the slanted portion. I needed more muscle to tear it away. That damaged the drip edge badly enough so that it needed to be replaced. The new solution works, but it’s not as cute. Oh well.

EPDM caulking is applied and hopefully the roof leak is cured (not true, as it turned out)

Caulked metal roofing
Days 2: Painted underlayment plywood with an oil-based primer (I used Zinnser, which is awesome, and very versatile) to allow the liquid rubber roofing a good adhesion. It took me a while to get used to this stuff, as it doesn’t spread easily, instead needing to be “dragged” by the brush and forced to go where I wanted it. Each piece took almost an hour to paint. It does dry quickly, so if I hadn’t run out of energy I could have dragged the panels up and started installing them the same day.

Thin and smooth, the underlayment I used to cover the original roof sheathing should be easy to handle by myself and also make a good base for the new roofing.
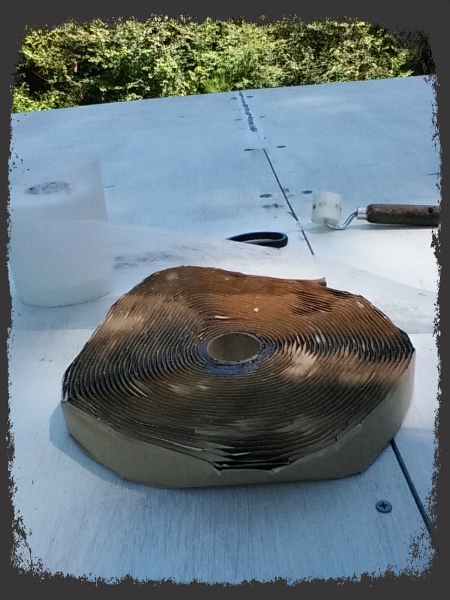
Days 3 and 4: Glued and screwed down the wood, and covered each hole and crack with butyl tape and polyester cloth. Working with the butyl was fun, like being in an art class at camp. It’s like a sticky clay..sort of. It’s often used on boats, as it’s unbeatably weatherproof, and even holds up if underwater. It’s also recommended for use with EPDM. You CANNOT use anything with silicone or that asphalt-impregnated stuff with EPDM. The polyester cloth wasn’t necessary for the flat surfaces of the roof, but does give the liquid rubber something to grab hold of. I bought it primarily for the vertical surfaces of the skylight base, which is where the pesky leak was. I thought it might also be useful for the edges of the new roof, to allow me to cover them and yet keep the stuff from dripping down the new flashing. It mostly worked. I did have to wipe off (with mineral spirits) a very few drips. I also think I’m going to reinforce the edges with uncured EPDM tape, as I want as much protection from low-hanging branches as possible. This is seriously sticky stuff. You’ll want to keep it in the fridge before using it on a hot day, trust me. It cures in the sun over time, just like the liquid EPDM does.
Primered underlayment is secured to the original roof sheathing, and now I’m using the butyl tape and polyester cloth to cover any and all holes, cracks, gaps, and around the edges and up the base of the skylight. The roller is necessary to smooth down the butyl.

Filling in the cracks between sheets of underlayment

I took a piece of butyl and rolled it in my hands to make a “snake”, then used the polyester over the top and rolled it smooth
Day 5: This is really where I needed to take deep breaths, as it was time to open the cans of liquid rubber, and start applying it. No turning back once the catalyst is added! I need to warn you, this is potentially very messy. Especially if you tend towards clumsiness as I do. I ended up tossing out all the clothing I was wearing that day, including my shoes! See, you have to use a special mixer on your drill, because liquid rubber is thick and gooey, and it takes a lot of mixing to get the catalyst fully blended in. What happened to me was, I was standing over the can, mixing away, when suddenly the can itself started twirling on the ground, creating a good-sized geyser of rubber. That’s how thick it is. So, wear old clothes, and make sure the can is on a non-slippery surface. Little insider tip.
Applying it was pretty easy, as it turned out. You have up to four hours working time. First, dip a brush into the mixed EPDM and cut-in around anything necessary. Then, pour the stuff onto the area you want to cover straight from the can. Take a squeegee (which you will have to toss afterwards) and spread it as best you can, and then use a good-sized paintbrush and smooth it level. You will have to toss the brush afterwards, too. Then, repeat the steps in the next area. Each gallon covers between 40 and 46 square feet, so it’s recommended you pencil in lines on the working area so you know how far to spread it. I found that helpful. You want a finished depth of about 20mm. I wasn’t working on completely level ground, but it still went OK for me.

EPDM is on and drying. Don’t walk on it for at least 12 hours! The seams show but are just as strong as the rest of the roof.

Dried EPDM now needs hot sun to fully cure. This takes weeks, and depends on the weather conditions. It will continue curing whenever the conditions are right.

Rubber-coated skylight base.
So there you have it! If I could have done this earlier, I would have. You do need warm, dry conditions, and fully dry materials. If your area (like mine) offers that rarely, then try to find a workshop or garage to do this in. It’s worth it, being that it’s relatively inexpensive, easy for a DIY-er, and should last years. Any rips or tears are extremely easy to fix with either EPDM caulk or uncured EPDM tape. Oh, and it comes in white and gray, too. Plus the company will special-order colors for you if that’s your thing. Good stuff. 🙂
I’m off now to hopefully finish painting the interior. More on that later. o/

This post consists mostly of pictures, as I actually remembered to take shots of most of the major steps. Maybe this will help someone…who knows?
Neither window leaks, and for that I am grateful. I’m OK with using them now instead of the wood windows, and in fact I think they look pretty cool. They were so easy to install!
I did take the time to CAREFULLY drill holes in the plastic bottom, to allow water to drain more easily, as especially the slanted one could otherwise overflow and start draining into the interior. Several heavy rains later I can attest to it working. 😀

Cutting the test hole for the window in the loft.
I wasn’t sure where to place the loft window exactly, as originally two very large wood framed windows were going to fill the entire space. I didn’t want it to be too high so as to hit the trim on the outside, nor too low for esthetic reasons on the inside. Hence, the exploratory hole and a lot of measuring.

After measuring inside and outside for a good placement, I used my circular saw to cut out the rough opening.

View from outside. The placement is good both inside and out.
The front is so ugly and boring still….

The RO still needs to be framed. Yeah, I did it backwards.

Framing and flashing is in
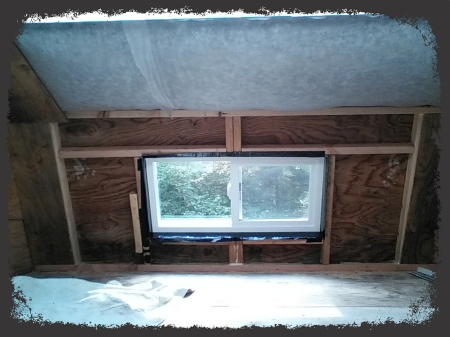
Loft window installed!

Loft window viewed from the outside

Janky window trim

Aaaaand, the finished window. Please ignore what’s happening up with the white drip edge. It was fixed later.

Finished back window from outside. Metal trim is for protection from water, but I’m not sure I like how much of it shows.
So. Water intrusion is a huge bugaboo for me. Here in the Pacific Northwest, water gets into simply everything, and then causes rot, rust or mold. I do NOT want any of those in my new home! Since I have so very much unused metal flashing, I decided to try to utilize it to keep water on the outside. The way I installed it, water goes from the roof, down the outside of the flashing, into the window flashing that sticks out, and then out the sides. Since neither window (nor the door, which I did the same way) leaks, I guess it worked.
The only thing is, there is so much metal above the rear window! I’m considering cutting some of the left-over T1-11, painting it to match the body, and cover a good portion of the upper metal. I don’t know…anyone have any ideas I can consider? I don’t want it to be too different from how I did the other window and door. Whaddayathink?

Here’s the thing. Originally I was going to use the old barn wood somewhere in one of my builds, but after years of being stacked out in the weather it is all too far gone. Plywood cut into planks (like you see on floors sometimes) seemed like a reasonable substitute, cheap, and easy to use. Turns out this is all true. It also turns out that if you use really really low-end plywood, the end result is not the sleek look I was expecting. Instead, I’ve ended up with a rustic, cottage-y looking effect, which actually looks interesting. So instead of this look found on http://www.domesticimperfection.com/2012/09/painted-plank-walls-finally/:

Smooth and lovely plywood plank walls
we have this:

Interior walls up. The corners will have molding to hide the spaces!
It might be difficult to discern in the picture, but the walls are far from smooth. Instead, each of the planks show what I like to call “personality”…bowing, sticking out a bit, and different textures. Visitors and curious bystanders tell me it looks fine, so we’ll go with that.

Caulking the plywood planked walls
A cool thing happened during this part of the build. Those metal bars that angle up the walls? In the way the entire time I’ve worked on this place. I was more than pleased when the planks slid behind them and into the small space between them and the studs perfectly. As in, I couldn’t have planned it better if I’d actually tried. Lucky, lucky.
Walls going in behind the metal bars. And yes, that’s Leo photobombing.
I used 3″ screws to attach each board to the studs. This house will be bouncing and jouncing on rough roads and tracks, and I don’t want anything popping loose. I did my best to sink the heads and cover them with a silicone/latex caulk to hide them, but I wasn’t always successful. Likewise with the ceiling. Normal caulk like you would use in your normal house, didn’t cut it. There was too much shrinking and cracking. The caulk I used works better under these circumstances, and is relatively easy to smooth, and to build layers as needed. It paints well, too. Overall, I’m happy with the results.
OK! Here’s the rub: I wanted to mirror the colors on my favorite skirt, a lovely combination of oranges, pinks, yellows and greens. It’s very summery and cheerful. However, translating those colors to this space is not going as I envisioned, and here is the current look:
OMG PINK
Yeah. not what I was looking for. Pepto, anyone? The lightest pale yellow on the ceiling and upper walls just looks like old, yellowed white paint. Argh! What to do?
To start with, I’m going to paint over all the yellow with a bright, shiny white. I realize glossy paints bring up imperfections, but this whole build is one giant imperfection so that really doesn’t matter. Glossy paint reflects light, and in such a small space, light is very important. Even that pale, pale yellow has visibly reduced the amount of light I perceive. I’ll paint the white down the walls to about 2/3s down, covering much of that pink. At that point, I’ll start blending in the yellow. Below that, I’ll blend in the oranges with a touch of red, and blend those down into the pink area. I’m hoping for a sort of sunrise effect. We’ll see how that goes!
Feel free to share your painting horror stories if you like in the comments. We’ll all understand and sympathize. 🙂 I’m off to work some more on the new roof now, so talk at you all later. o/

Things on the house are changing nearly daily, so I keep putting off posting anything. Which is silly, because now I have a huge backlog of things to put up! I’m trying to document what I’m doing with the build both for myself and for anyone out there who is crazy enough to attempt to do what I’m doing (only hopefully in a less janky manner..).
I *plan* on posting each project up separately, but here’s a quick and not-at-all complete update on where things are at:
So that’s a bit of what’s been happening here. Thanks for sticking with me through the long silences. Not many of you comment (which you should, if you have any questions or thoughts on this whole thing) but I know you look at the posts.
A thank you! for my gaming buddy who donated to help me get new roof sheathing when he heard about the leak. You’ve been great support, and I appreciate it very much.
Tired, going to play a game, listen to some Leonard Cohen, and pass out. Take care! o/

I know it’s 7 years bad luck when you break a mirror, but what’s the penalty for breaking a window? Dammit.
So! Change in plans. After the shock and horror wore off (could have been minutes, could have been hours ~ time stopped. JK) I went in search of the new-fangled plastic, double-paned windows I’d purchased for the original TH. Confronted with using either huge 3′ by 5′ suckers or more reasonable but smaller than I’d wanted windows, I went with a 31″ by 21″. Now, here’s the thing: I’d already cut the rough opening in the wall and flashed it, not to mention having to redo the framing. Nooooo…..

Rough Opening ready for the large wood window. Yes, that’s copper sheeting. I was going to put that on all the window openings for a bit of style 🙂
Patching went ok, but now the back of the building doesn’t look nearly as good. The patch is really obvious right now, and I don’t know if all the caulking and painting necessary will change that. Plus, water entry is now more of a risk. Such a bummer! At least restructuring the framing went quickly.

Restructured and patched Rough Opening w/o the copper sheeting, as it won’t show in this type of window install.
The upside of this huge change in plans? Installation was a breeze, and I immediately had an opening window complete with screen. That was cool. 🙂
Then the snowball effect kicked in.
As I stood there looking out my new window (yay) I contemplated the other two windows that were going in next to it. No way. Two old-fashioned (but cool) wood windows inches from a modern plastic window? Nope. I looked at the stack of double-paned choices and compared them to the framing already in place. Nope again. I just didn’t want to do it. The single, smaller window surprised me with the amount of light it let in, so right there I decided one was enough. This decision opened up changing the interior layout I’d planned on, so I spent the night obsessively redrawing plans. Because of course. And that wasn’t all, as now that I wasn’t using wood windows in the rear, I got really hesitant to use them in the front…and after checking to make sure double-paned plastic framed windows can safely be installed at an angle I’m going to do that. So much less light, so much reduction in views. A hell of a lot easier installation, so little risk of more breakage.
So a lot of changes, a bit of heartbreak, and much work later, here’s what things look like now:

Framed, flashed and installed.
Before I go, here’s the latest pictures of Leo hanging out in the new place:

Leo barely fits through the door opening, but likes to look out.

Leo on the ladder outside. Doesn’t he know not to stand on the top???
I’m still working hard on the walls, and painting. Stay tuned!

Design And Live Outside the Lines
renovation, interior design, diy, london
In Christ...
Mystical Enlightenment
Living large on next to nothing
Pops goes on tour.
Choose love and adventure
The Lives and Training of Service Cats
The blog about living life out of a prius and the adventures and life lessons along the way.
Patriots, Health Care and Humor
Living on less and enjoying life more
Hop in and join the ride
Two retired educators touring the country in their motorhome
I am a painter, a daydreamer and creating art is my passion.
Janis' Wanderings, Tiny House and Albania
Tiny house tours and resources in DC
Creating "new" from old, building and living in a tiny "reclaimed" house. Beginning in 2012, I will live in this 216 square foot space as I pursue my PhD studies in Literature and the Environment. In this way, I hope to live a little smaller, leave a little lighter, and learn in what ways formal study can be acted in the every day.
Recreation - Re-creation: Things made by Matt Rae
Construction of a mythical tiny house
Enjoy The Sweet Life
My atempts at writing a book - how hard can it be?
The official page of the artist created to host the project 'CUT OFF'.
open mind art ;)
My Bariatric Surgery & Weightloss Adventure
Film & Digital Photography, Vintage Cameras, Travel, Music.
diy mini camper van, Casita & Aliner trailer mods, camping, outdoors, all things nature
Welcome to the world of cats!
